Software
A NOT observing course project has been created to the Puhti supercomputer provided by the CSC (Tieteen tietotekniikan keskus Oy, Finnish IT Center for Science Ltd.). IRAF, ds9, Gaia, and SNID have been installed to the course project.
Important, make backups and save your data! All course directories will be permanently deleted when the project is removed in the end of February 2026! See below the info on copying data to your own computer.
Creating an account on Puhti
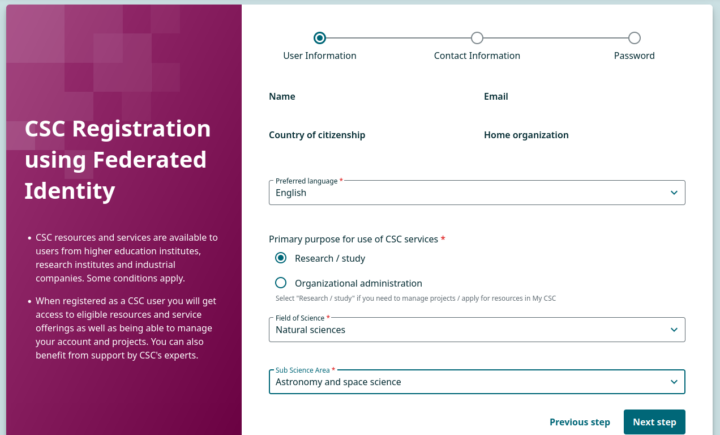
If you are not yet a CSC user, you need to carry out the registration. Follow the link https://my.csc.fi and select Create account. Select Haka as your authentication profile and login with your university credentials. For the User Information select Preferred language, Primary purpose for use of CSC services (Research/study), Field of Science (Natural sciences), Sub Science Area (Astronomy and space science), and proceed with Next step. For the Contact Information you need to fill in your phone number and address information, and proceed with Next step. For the Password invent a password and accept the terms of use and privacy notice, and proceed with Submit.
As a recent change, you need to activate multi-factor authentication (MFA) for using Puhti. Follow the link https://my.csc.fi/mfa-activation-login and select Haka as your authentication profile and login with your university credentials. If you do not already have an authentication app on your mobile phone, install via your app store one of the commonly used apps (e.g. Google Authenticator, Microsoft Authenticator, FreeOPT, or other compatible authentication app). Via the CSC MFA activation process, scan the QR code with your authentication app, fill in the verification code, and enable MFA.
A CSC invitation link will be sent by the organizers. Select Haka as your authentication profile and login with your university credentials. It is advisable to proceed with the aforementioned CSC registration and MFA activation before proceeding to access the course project via the invitation link. After login and select Apply for membership to get access to the project. When the project manager has approved you to the project you will get an email from info-noreply@csc.fi and you can now login to the project environment with your Haka credentials and MFA.
Connecting to Puhti
Follow the link https://www.puhti.csc.fi and select Log in. If you encounter issues with the login page with the Safari browser on MacOS, try Firefox or Chrome browsers. Please note, that it might take up to a few hours to get access to Puhti after the approval and initially an error message “This account does not have access to Puhti” is possible.
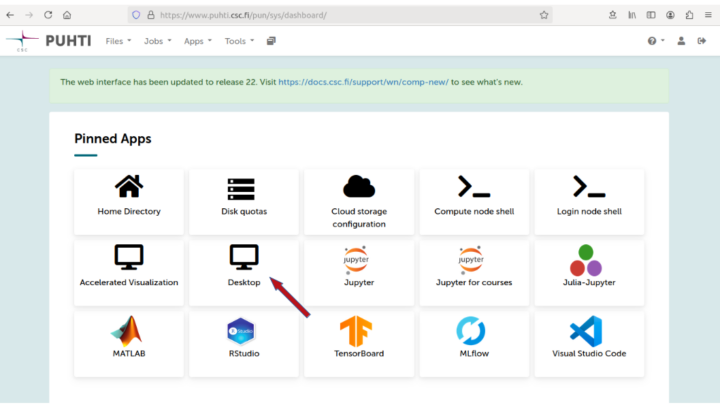
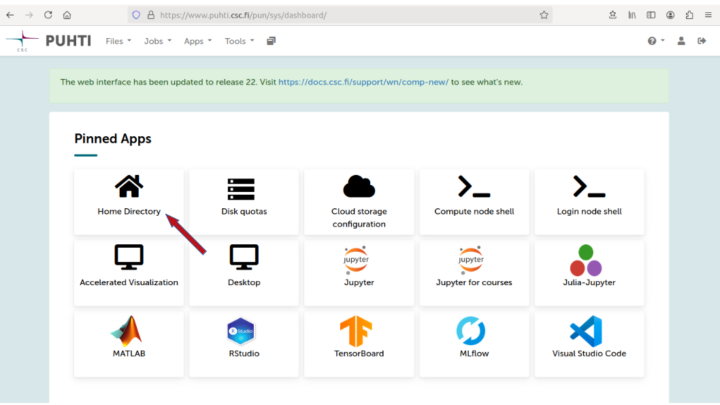
From the Pinned Apps options select Desktop. This will provide a Desktop parameter screen.
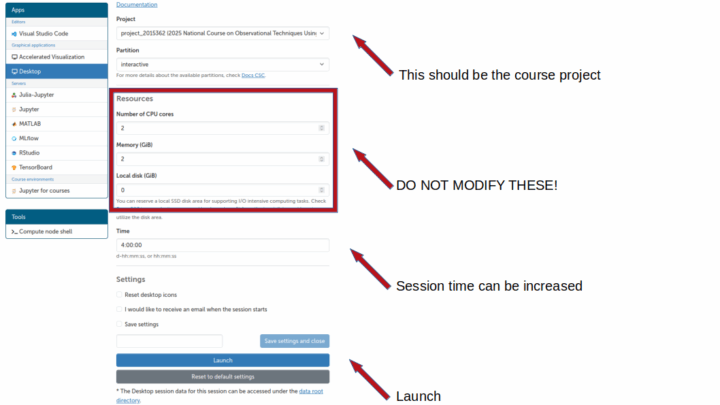
Important, do not change the Resource parameters [Number of CPU cores = 2, Memory (GB) = 2, Local disk (GB) = 0] from the default. The data reduction software (e.g. IRAF) will not get an advantage from increasing the number of CPU cores!
The default Time for a single session is 4 hours in the Desktop resource selection, after which the connection will close automatically if not done before; however, a new session can be immediately launched.
From the Desktop options select Launch to prepare the session.
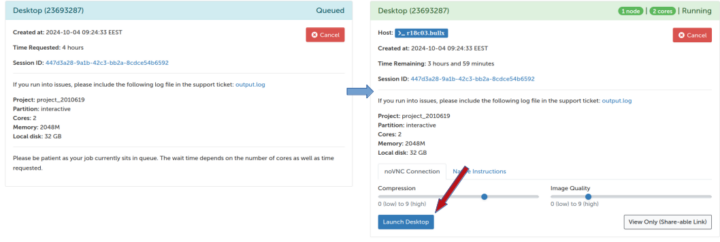
Wait for a moment while the job is in the queue. When ready, select Launch Desktop.
This will open the dashboard view to your project home directory Desktop. To quickly get started, at the bottom of the Desktop you have icons e.g. for a terminal, a browser, and file directory.

To close the session, select from the top left Applications -> Log Out -> Log Out. The created session can be deleted with the red Delete button on the Desktop launcher page; this will not affect your files, they will remain on the home, project and scratch directories.
Software
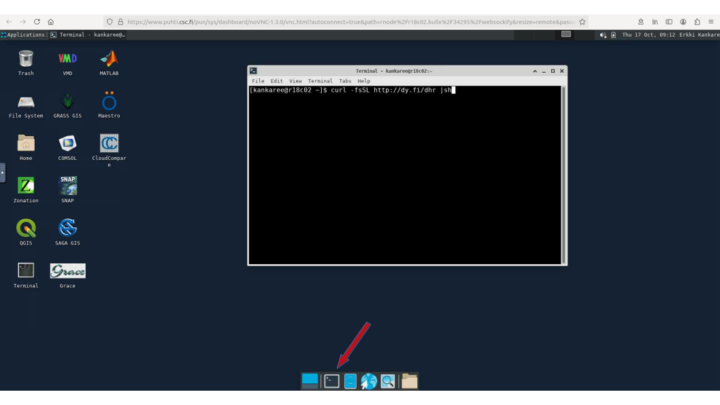
To initialize the software listed here, open a terminal and run the following command:
curl -fsSL http://dy.fi/k8h |sh
This has to be done only once. There is no need to repeat this at subsequent sessions.
Iraf
1) To activate the iraf software, open a terminal and write the command xgterm &
2) Write the command irafcl to your newly opened xgterm terminal to start iraf.
3) To open ds9 write the command ds9 & in a terminal.
Starlink Gaia
To activate the starlink (https://www.eaobservatory.org/~s.graves/WWW/) software gaia, write the command gaia & in a terminal.
NB: There seems to be an issue that starting Gaia will result in an error message if ds9 is already running. In this case, close ds9 and start Gaia again. However, it seems to be fine to start ds9 after Gaia is already running.
SNID
To run SNID e.g. for an ascii file supernova.dat write the command snid supernova.dat in a terminal.
Copy data to your own computer
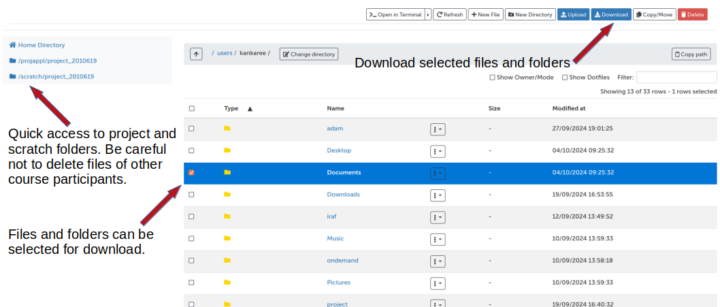
After login into Puhti, from the Pinned Apps options select Home Directory. This will give you access to your home folder.
By marking the boxes on left of files or folders, the selected items can be downloaded with the blue Download button at the top row of the page.
Puhti disk areas
https://docs.csc.fi/computing/disk/
You will have your own Personal home directory at /users/ with a size of 10GB (and a limit of 100 000 files).
Everyone will have access to the Project folder projappl at /projappl/<project> with a size of 50GB (and a limit of 100 000 files).
Everyone will have access to the Project folder scratch at /scratch/<project> with a size of 1TB (and a limit of 1 000 000 files). This folder is cleaned after 180 days.
Our <project> is project_2015362. The setup script in the software section will create convenient project and scratch soft links to the directories in your home folder.
The listed software (e.g. IRAF) will work also on projappl and scratch disks. If you want to work on projappl or scratch folders, please, make your own subfolder (called e.g. by your lastname) for this. Since everyone on the course can access the projappl and scratch folders, be careful not to delete data that belongs to other participants! For the same reason, do not store personal data on these folders.